TOU
My tutorials are written by me and are the results of my own imagination. Any resemblance to another tutorial are purely coincidental.
Please DO NOT claim any of my tutorials as your own.
You may us my tutorials for challenges but please link to my tutorial on my blog.
You may not translate my tutorials.
DO NOT RIP MY TAGS
If you have any questions regarding my tutorials, please feel free to email me at gwils2007@gmail.com
Animation Sites
PS Tut sites
Font Sites
Saturday, September 12, 2020
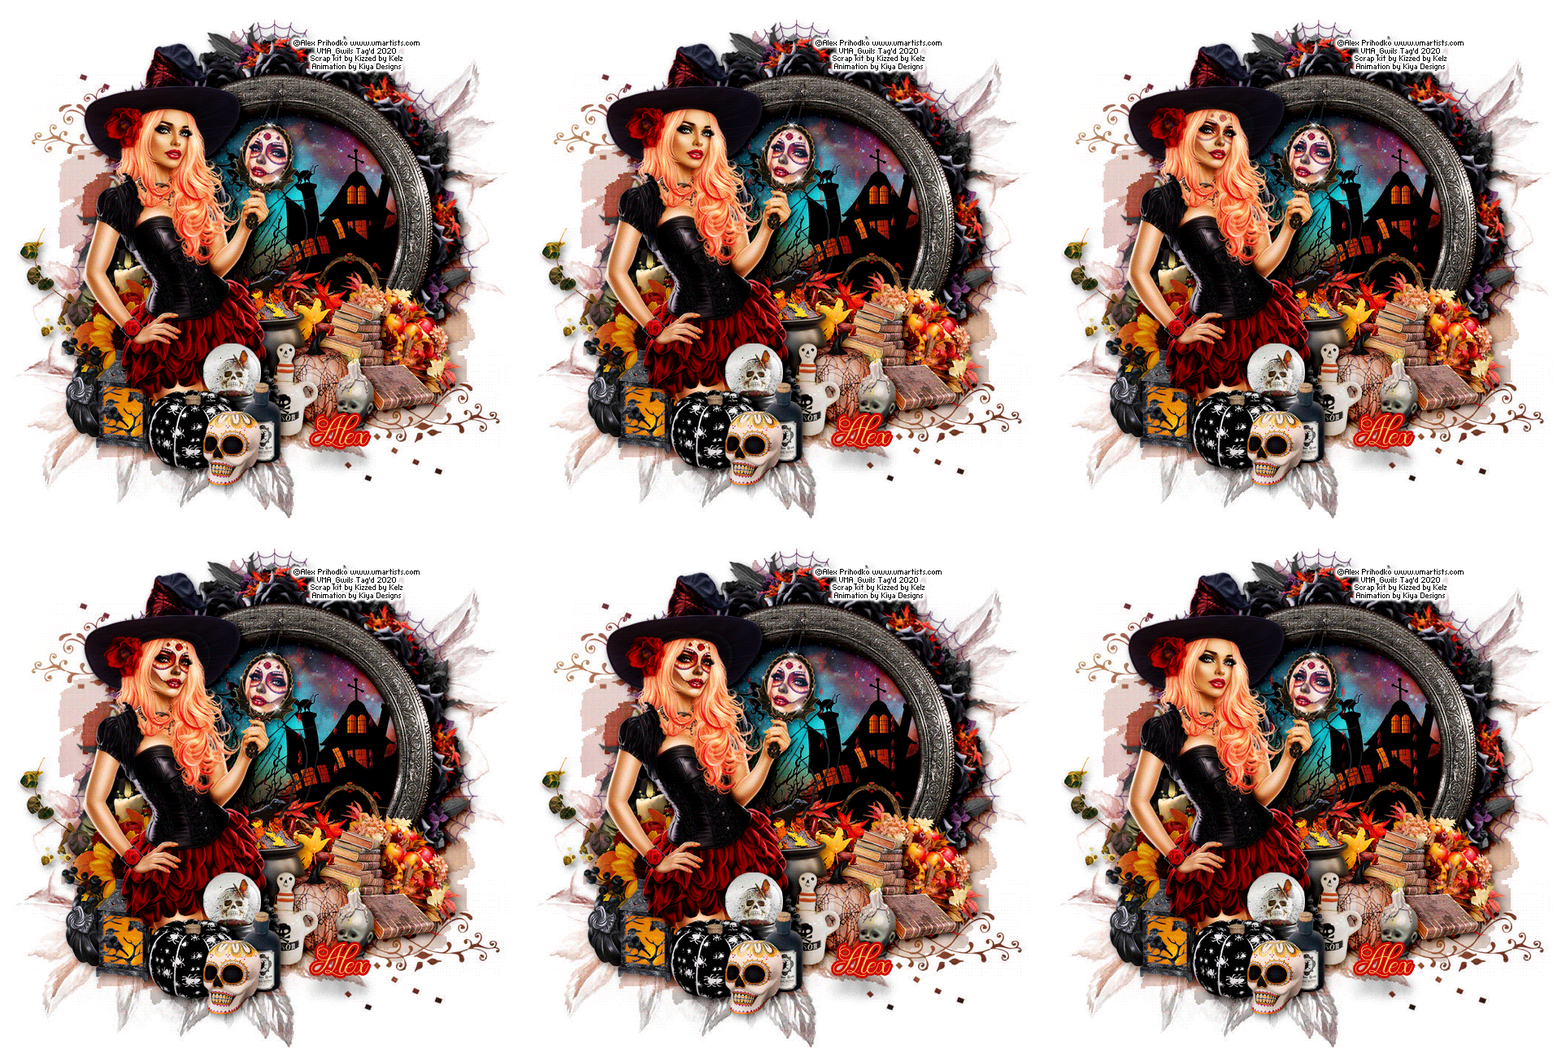
Bootiful Reflection
This tutorial was written by me on September 12, 2020. The results are of my own imagination. Any resemblance to another tutorial is purely coincidental.
Please DO NOT claim this tutorial as your own.
This was written assuming you have a working knowledge of PS.
Please keep in mind that I write the tutorial as I am creating it.
Sometimes I may not explain properly where to place things so please see my example if you are ever in doubt :)
Supplies needed
I am using CS5 but this tutorial should work with any version.
You can download the 7 day trial of ps here.
PTU Tube: I am using a beautiful tube called "Halloween Witch 9" created by Alex Pri. Please do not use this tube without a proper license.
You can purchase this tube at VM Artist's store here.
PTU Kit: I am using a gorgeous matching kit called "Halloween Witch 9" created by Kizzed by Kelz. You can purchase the kit here.
PTU Animation: I am using Kiya Designs animation 81 from package 27. You can purchase her fun animation at her store here.
Mask: 59 by Mizteeque's. Thank you for your awesome masks. You can download it from her blog here. I am using the png versions for this tutorial.
Font of choice for your name.
Plug in: Mura Meisters, copies.
Drop shadow of choice.
Please read all the Artist's/Designer's TOU.
Let's get started.
Remember to save your tag often in case PS crashes. I always save my tags as a psd image. It keeps all the layers and if you make tags for others you will always have the template.
To open an image, I click on the element or paper in the file folder and drag it into PS.
To transfer an element or paper in PS to my tag, I left click and drag it into my working canvas.
The other way is to left click and drag the element from the folder right onto your tag.
Either way you will get the same results :). I will be using the first method for this tutorial.
For resizing, mirroring and rotating I use the Ctrl+T command.
To mirror or Flip go to Edit, Transform, Flip Horizontal (mirror) or Flip vertical (Flip).
Open a new 750x800 transparent image. We will resize later.
Go to layers, New fill layer, solid color. When the pop up window appears type in FFFFFF and click ok.
Select Mizteeque's mask and drag it into the tag. Your free transformation box will appear. Click the link icon between the W and H and type 40%. Click the check mark.
Drag paper 11 into your tag. Click the link icon between the W and H and resize 39%. Click the check mark.
Standing on the paper layer in the layers pallet, right click and select create a clipping mask.
Drag element 97 into your tag. Click the link icon between the W and H and resize 40%. Click the check mark. Move to the top center of the mask.
Select the paper layer and drag paper of choice into the tag. I used paper 5, Click the link icon between the W and H and resize 20%. Click the check mark. Move under the frame.
Select the frame layer, using the magic wand, click inside the frame. Select, modify, expand by 5.
Select the paper layer under the frame. Go to Layers, layer mask, reveal selection.
Select the clipping mask layer.
We are going to start making the cluster.
Drag element 159 into the tag. Click the link icon between the W and H and type 15%. Click the check mark. Right click this layer and rasterize layer.
Filters, Mura Meisters, copies with the following settings.
Click ok.
Ctrl + T and click the link icon between the W & H. Resize by 105% and click the check mark. Move this so it shows on the outside of the frame.
Repeat the above steps for other elements you would like to use. Don't forget to Rasterize the layers before applying Mura Meisters.
I used the following:
Element 57, resize 15%. Mura Meister, copies but changed the number to 7. Drag this layer under the leaves layer. Duplicate and hold down the ctrl key and click on the original web. Right click and merge layers.
Element 94, resize 15%. Mura Meister, copies but changed the number to 9. Resized 108. Drag this layer under the leaves layer.
Element 58, resize 10%. Mura Meister, copies but changed the number to 12. Resized 105. Drag this layer under the leaves layer.
Element 117, resize 10%. Mura Meister, copies but changed the number to 15.
Use any other elements you would like for your cluster.
Select the frame layer.
Drag element 160 into your tag. Click the link icon between the W and H and resize 20%. Click the check mark. Edit, transform, flip horizontal. Move to the bottom right of the frame.
Drag element 159 into your tag. Click the link icon between the W and H and resize 30%. Click the check mark. Move to the bottom of the frame.
Drag element 91 into your tag. Click the link icon between the W and H and resize 25%. Click the check mark. Move to the bottom of the of the leaves.
Drag element 95 into your tag. Click the link icon between the W and H and resize 20%. Click the check mark. Move to the left of the frame.
Drag element 157 into your tag. Click the link icon between the W and H and resize 35%. Click the check mark. Move to the bottom left of the frame by the trees in the paper.
Drag element 85 into your tag. Click the link icon between the W and H and resize 10%. Click the check mark. Move to the bottom right of the cauldron.
Drag element 122 into your tag. Click the link icon between the W and H and resize 10%. Click the check mark. Move to the bottom right of the pumpkin.
Drag element 86 into your tag. Click the link icon between the W and H and resize 10%. Click the check mark. Move to the bottom left of the pumpkin.
Drag element 54 into your tag. Click the link icon between the W and H and resize 20%. Click the check mark. Move to the bottom left of the mask.
Drag element 61 into your tag. Click the link icon between the W and H and resize 10%. Click the check mark. Move to the bottom left of the cauldron.
Drag element 2 into your tag. Click the link icon between the W and H and resize 15%. Click the check mark. Move to the bottom left of the mask by the black pumpkin.
Select the main tube. Hold down the ctrl key and select the layers you would like to use. Once all the layers are selected, press ctrl+G to group the layer. Click and drag it over to your tag. Hit Ctrl + T. In your tool bar. Click on the link between the Width and Height to lock them. When we type in a number it will resize both the width and Height as the same time. Type 39% in the Width and then click on the check mark at the end of the tool bar. Move the tube to the bottom left of the mask. Rename this group Tube.
Click on the arrow beside the group to expand it. Now hold down the ctrl key and select the tube, skirt and mirror layers. Right click and merge layers. Drag this layer under the mask layer.
Next, right click on the tube layer and duplicate. Filters, blur, Gaussian blur of 3. Change the blend mode to soft light. Repeat this step for the mask layer. You now should have two tube layers and two mask layers.
Now click on the eyeball beside the mask layers to hide hide them. Click on the arrow again to hide the sub layers.
Drag element 1 into your tag. Click the link icon between the W and H and resize 12%. Click the check mark. Move to the bottom right of the tube.
Drag element 9 into your tag. Click the link icon between the W and H and resize 10%. Click the check mark. Move to the bottom left of the tube.
Drag element 36 into your tag. Click the link icon between the W and H and resize 10%. Click the check mark. Move to the bottom right of the skull globe.
Drag element 68 into your tag. Click the link icon between the W and H and resize 10%. Click the check mark. Move to the bottom right of the pumpkin.
Add any other elements you like and make any adjustments to the layers.
Crop away any extra space.
Image, Image Size and resize 650 on the longest side. See my settings below.
Oh almost forgot we need to drop shadow all of our elements. I actually do the drop shadow at the end :)
Select the element on the bottom of your tag in the layer pallet and double click it.
A layer style window will pop up. Click on Drop shadow. and use the following settings.
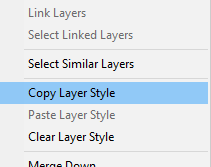
Now right click on the layer you just applied the drop shadow. Click copy layer style.
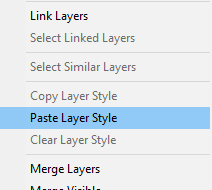
Now click on the layer above and hold down the shift key, select the layer just under the paper layer. Right click and paste layer styles.
Select the frame layer up to the layer under the tube group. Right click and paste layer styles.
Expand the group layer. Select the original tube layer only. Rick click and paste layer styles. Click on the arrow to hide the sub layers.
Select the layer above the group layer. Hold down the ctrl key and select the top layer. Right click and paste layer styles.
Drop shadow complete :)
Add your copyright and name.
If you do not want to animate. Hide the white background layer Save your tag and export as png.
Might want to grab a coffee :)
Open Kiya Designs psd file in PS. You will notice that there is 20 layers in this animation and it does not have the group layer. That is ok as we are going to learn how to do this so it matches the animation layers of the tube.
We need to group all the layers. Starting from layer 20, hold down your control key and select each layer so the next one will be 19 then 18 etc. Once all the layers are selected (the layers will be highlighted in blue) we need to group them. All layers selected?
Next we need to group these layers. Go to Layers, Group layers or Ctrl + G on the Keyboard. You will see group 1 folder at the top. Make sure Group 1 is selected.
Select the layer you would like the animation to be placed. I selected the paper layer under the frame.
Back to the animation. Click on Group 1 and drag it into your tag. Move to a spot you like best. I moved it to the center of the frame. Don't worry about the part showing outside the frame we will fix that.
Close the original animation and don't save changes.
Holding down the alt key, click on the thumb nail of the mask on the paper layer. Now drag this up onto the group layer. You should now have two mask layers. One on the paper layer and one on the group layer.
Click on the little white arrow beside Group 1 to expand it. Click on the eyeball of each layer to hide it but leave frame layer 1 visible. Click on the arrow beside group one to hide it as we do not want to accidentally make any changes.
Next make sure your animation viewer is open on the bottom of PS. I you do not see a row that has Animation (Frames) on the bottom, go to Windows, Animation.
Next is animating.
Click on the little icon at the right end of the animation screen then select make frames from layers.
When the pop up shows select Make Frames from Layers
You are going to see a big mess in the animation window but we are going to fix this.
Click on the first frame and click on the trash can in the animation window. Repeat this until you reach the first frame of the animation.
Now you should be at the first frame of the animation. Click on frame 21 and hit the trash can. Repeat for all the remaining frames. You should be left with 20 frames in the animation window. This is the amount of frames for our animation.
This next step is very important. Any changes you do from here you must be on frame 1 in the animation window. It will be highlighted in blue. Unless otherwise stated.
Go to the bottom of your tag in the layers pallet. Make sure you have animation frame 1 selected.
Click on the eyeball beside each layer to make it visible with the exception on the tube layer. You want to expand it and only have the tube and tube Gaussian layer visible. For the white base layer you may have to click on the eyeball a couple of times to make it visible in all the animation frames. It's a Photoshop thing. Do not touch the animation group layer.
Ok here is were the fun part comes in. Pay close attention to which animation frame you are selecting.
Select frame 10 and make both masks visible in the tube group.
Select frame 11 and make both masks visible in the tube group.
Select frame 12 and make both masks visible in the tube group.
Select frame 13 and make both masks visible in the tube group.
Select frame 14 and make both masks visible in the tube group.
Select frame 15 and make both masks visible in the tube group.
Select frame 16 and make both masks visible in the tube group.
Select frame 17 and make both masks visible in the tube group.
Ok next step.
Select frame 7 and holding down the shift key select frame 10. You should have 4 frames highlighted in blue. Select the two mask frames in your layer pallet.
On the top right corner of the animation viewer, click on the little icon that looks like it has an arrow and four lines. Select Tween.
Use the following settings and click ok.
Now Select frame 17, holding down the shift key, click on frame 20. Make sure the two mask layers are still selected.
Repeat the Tween with the same settings.
Next, I want to slow down the animation. With the first frame selected, hold down the shift key and click on frame 20. This will select all the frames.
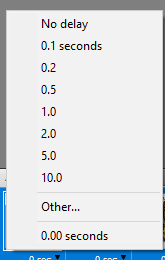
Next, click on the little black arrow beside the 0 sec as we want to change the speed. A pop up window will appear.
I selected 0.2 Sec. Now click on the play button to view the animation. Click on it again to stop it.
Click frame 1 again so we don't accidentally make any changes.
Now to save our tag as a gif.
Go to File, save for web device.
A new pop up window will appear. Change the settings to my screen shot below. Click on the image to enlarge it if needed. Click save. My screen shot will look different but the settings are the same.
I hope you have enjoyed my tutorial. I would love to see your results.
Say Hello
Followers
Categories
- 4/20
- Addictive Pleasures
- Adrienne's Designs
- AI by TK Dezigns
- AI Tube
- Alec Rud
- Alehandra Vanhek
- Alex Prihodko
- Alien
- Amber
- Amberly Berendson
- Angel
- Animated
- Anna Marine
- Antracit
- AoRK
- April Fools Day
- Atarika
- Atelier de Minja
- Attila
- Autumn
- Barbara Jensen
- Barbara Jensen Bonus
- BCA
- Bella Caribena
- Blaque Heart Designz
- Blu Moon Designs
- Canada Day
- Carita Creationz
- Carmins Chaos
- CDO
- CDO Animation Collab
- CDO Scrap kit Collab
- Chaos Priestess
- Chinese New Year
- Chris Pastel
- Christmas
- Cinco de Mayo
- Circus
- Collab
- Curious Creative Dreams
- Dark/Goth
- Deedles Dun It
- Dia de Muertos
- Digital Art Heaven (DAH)
- Dilara
- Doodle by Design
- Easter
- Eenniizzie
- Egyptian
- Elegance Fly
- Elias Chatzoudis
- Ellie Milk
- Emo
- Enamorte
- Enys Guerrero
- Fairy/Elf
- Fairytale
- Fantasy
- Father's Day
- FB Timeline
- Fiodorova Maria
- Foxfoggydog
- Foxy Designz
- Free Kit with Purchase
- FTU Animation
- FTU Cluster used in tutorial
- FTU Kit used in Tags
- FTU Scrap Kit Tutorial
- FTU Tube
- Games
- Get Well
- Goldwasser
- Gothic Inspirations
- GriAnna
- GrnIz Dezinz
- Gwils Creations Animation
- Halloween
- Hania's Design
- IKH Designs
- Jasmine Becket-Griffth
- Jenny
- Jonas Jodicke
- Julia Fox
- July 4th
- Kajenna
- Karmalized Scraps
- Katharine
- Kela
- Kiya Designs
- Kizzed by Kelz
- Lady Mishka
- LadySky
- Laguna
- Legends
- Luna Bella
- Luscious Ladee
- Mardi Gras
- MarusovA Art
- Mary Art
- Mermaid
- Michael Calandra
- Misticheskaya
- Mother's Day
- Movie
- Nautical
- Nene Thomas
- New Years
- Nocturne
- Old School Tag
- Olga Menshova
- Oriental
- PFD
- Phobia
- Pink Paradox
- Pirate
- Popeye Wong
- Prehistoric
- PS Tutorial
- PSP Tutorial
- PTSD
- PTU Tutorial
- Queen Uriel
- Rebel Dezigns
- Remembrance Day
- Renaissance
- René Kunert
- Sarah Richter
- Savage Dezines
- School
- Scraps Dimensions
- Scraps of Enchantment
- SDNC
- ShelleyLynn Designz
- Sheokate
- Simona Candini
- Snags
- Sophisticat Simone
- Spring
- St. Patrick's Day
- Stanley Morrison
- Starlite & Soul
- Steampunk
- Stella Felice Art
- Summer
- Sunny Rose
- Tag Show Off
- Tanisia_art
- Template
- Thanksgiving
- Tiny Turtle Designs
- Toria
- Trinita
- Unicorn
- Using Multiple Animations Tutorial
- Vadis
- Valentine
- Verymany
- Vi Nina
- Vinegar
- Vintage
- VM Artist
- Wallpaper
- Western
- Wicked Diabla Designs
- Wicked Princess Scraps
- winter
- Word Art
- Yuki
- Yulya
- Yuriko Shirou
- Zlata_M
Archives
-
▼
2020
(86)
-
▼
September
(22)
- Rosemary
- Seeing Red
- Boehoeh
- Vampire Seduction
- Enchantress
- Our Hero
- Steampunk Beauty
- Spell Binding
- Witch's Elixir
- Vampire
- Victoria
- Bootiful Reflection
- Rosie
- Favorite Season
- Beauty of the Night
- Back to School
- Timeless Navigator
- Autumn Mourning
- Ghoulishly Delightful
- Baba Yaga
- Halloween Party
- Whimsical Circus
-
▼
September
(22)


